Getting Started
From MorphOS Library
Contents
- 1 A Beginner's Guide to MorphOS
- 2 Getting Comfortable with the User Interface and the Ambient Desktop
- 3 Installing, Updating, and Configuring Essential Software
- 4 More Configuring
A Beginner's Guide to MorphOS
You have installed MorphOS to a compatible machine, but... now what? You could always go and install a pre-configured package like Chrysalis, but you would end up with a system configured for someone else's taste and you still wouldn't know how to actually use the operating system. If you are in this situation and would like to learn how MorphOS works, this is a tutorial for you! The tutorial will guide you through the things you should do and notice after a fresh install, with practical examples from basic configuration options to installing new software. It won't cover all the details and is just an opinion on how to proceed, but it should give you some knowledge how to continue on your own and make your own decisions.
Getting Comfortable with the User Interface and the Ambient Desktop
The First Boot
After a boot you're presented with the plain looking Ambient, the desktop environment of MorphOS. The first thing you should learn is to get familiar with the basic usage, and to tune the interface settings so that they won't annoy you. The worst thing is if a user plays around a bit and just curses at the system when it doesn't work as expected or wanted. You aren't forced into just one kind of behaviour with MorphOS!

Right mouse click is widely used on MorphOS and if you're using a device without a physical button for it, check the tips over here. Pressing the right mouse button over the Ambient screen opens Ambient's pulldown menus where you can find few important options. For example, options to shut down the system, to open a new shell window, or to open system settings.

System Settings
The MorphOS Preferences application is used to edit system-wide settings. It can be launched from the Ambient's pulldown menu by selecting the "Settings->System..." menu option or by browsing to the System:Prefs/ drawer and double clicking the Preferences icon.


Screens
If MorphOS didn't get the optimal resolution of your monitor with DDC, a different screen mode can be selected from the Screens settings. If the wanted mode isn't seen there, open the Monitors settings instead to create a completely new mode.
If you have a graphics card with a low amount of memory, you can try to make the memory consumption smaller by disabling the Enhanced Display setting (3D accelerated graphics functions for 2D screens) or by reducing the color depth. More information can be found here.
MorphOS skins (themes for the graphical appearance) can also be changed from the Screens settings.

IControl
IControl settings are the most important settings for the overall user experience. This is the place to look in order to avoid the usual comments like "Why doesn't X work like Y in the other OS?", "Why there isn't a feature Z?", "I can't use a system like this!". Everyone should check these settings first before going any further.
Hotkeys
MorphOS has many nice features to use with keyboard shortcuts or mouse buttons, but only few are activated by default. Let's activate more!
To add a new hotkey for the wanted function click the popup button on the right side, select "Sample", and press the wanted key combination. The pressed combination is then recorded on the corresponding line and should be shown there. Repeat the procedure if you didn't get it as wanted on the first try. Changed settings will be taken into use after you click the Save or Use button.
Here is how to set the "control left-alt c" key combination to center the active window on the screen:


Here are some other recommendations to activate, but feel free to use your own preferences for the hotkeys:
- Active Window: To Back - double click with middle mouse button to send a window back of other windows.
- Active Window: Zoom - "control left-alt m", to toggle between a maximized and minimized window.
- Active Window: Activate Next - "left-command tab", to have the alt-tab functionality found on many other operating systems. Using ctrl-tab or alt-tab isn't recommended because they would overlap with the shell's functionality on MorphOS. Command-tab also happens be the same in OS X.

Note: You can also add several hotkeys for a function by selecting the New Hotkey option from the popup button's menu.
Screens and Desktop
Important options concerning how windows and menus behave can be found on the Screens and Desktop settings.
I'd recommend turning on the Maximize window when clicking on the Zoom gadget option. The Zoom gadget will then toggle the window size between full screen (with the screen title bar still visible) and the initial window size and position. I find it much more comfortable than the legacy placement between two obscure positions. The previously configured Zoom hotkey will also work better with this option enabled.
If you prefer being able to drag windows out of the screen without pressing any qualifier key, like on mainstream systems, select the When dragging windows... allow them to be placed out of screen, unless Control is pressed option.
The default behaviour of the pulldown menus may be a bit unfamiliar for old Amiga users, but there are several options to get them working as expected. I like to disable the Menus shall remain opened even when mouse button is released option and enable the Open menus under mouse pointer outside screen titlebar area option.


Touchpad
If you're using a laptop system, check the Touchpad setttings. You might want to disable clicking from the pad to avoid any accidental clicks.

Laptop
If you're not a Mac user, you might find it odd that you need to press the fn key when using the function keys for normal activities, and not when modifying, for example, the screen brightness. The Press and hold the fn key to modify screen brightness, audio volume, etc. option will change the functionality the other way around.
Some systems also have the Automatic LCD brightness and keyboard backlight control option here. Disable it if you're annoyed by changing lightning.

Ambient Windows
The first icon you see on the Ambient desktop is the "My MorphOS" icon. By double clicking it you'll get a window with icons of all volumes and assigns of the system. It works like a root directory with quick access to different locations.

If you find it a bit clumsy to work in the icon mode, like I do, you can change the view to the list mode from the cycle button on the right side of the window.

With default settings Ambient doesn't remember the changed mode or other window properties next time you open it, but you can right click the window border or an empty area on the file lister to bring up a contextual window menu and select the "Snapshot->Window" option to save the window properties. Default position and size for a window can be saved that way too. If you defined the centering hotkey earlier, you can try it now :)

The same can also be done for normal directory windows. While "My MorphOS" window settings are exceptionally saved to Ambient's configuration files, normal directories' settings are saved to an icon file (a file with .info extension). If you change and save the mode for the Work: partition for example, you see a disk.info file appearing there.


Displayed columns can be selected by right clicking the column title area, but modify the default lister settings to your liking before starting to save settings for individual windows.

Ambient Settings
Ambient is actually a separate application itself and it has its own settings separated from the general system preferences. The previously mentioned system settings affect all programs and screens, but strictly desktop related settings are found in the Ambient settings. The Ambient Settings window can be opened by selecting the "Settings->Ambient..." option from Ambient's pulldown menu.

Miscellaneous
The Miscellaneous page on the Ambient settings has a nice option to get the My MorphOS window opened when double clicking anywhere on the empty area of the desktop. It really speeds up the working when you don't have to move the mouse a long way to the top corner or dig the icon out from under some other windows. Enable it with the Double click on desktop opens MyMorphOS window option.
The My MorphOS icon is just wasting space on the desktop after the previous setting and you can hide it by disabling the Display MyMorphOS icon option.
If you like to have a bit more eye candy on the context menus, you can also enable the Show images in context menu option while you're here.

Lister
The default properties of the list mode of Ambient windows can be changed on the Lister settings. Disable the Compact size display if you want to see exact file sizes in bytes always. You may also want to select different columns to be shown in the listers by double clicking items on the File Properties list to set them hidden or shown. Date & Time instead of just Date would probably be a common choice.

Panels
Many new users are wondering if there is any kind of dock application on MorphOS, because there isn't any shown by default. MorphOS has panels for that and you can have as many panels as you want on the desktop, arranged horizontally or vertically. The panels have features like zipping to hide and unhide them, sub panels and other Panel Object plugins, etc. There just isn't any configured by default and user can create a panel or panels how he likes.
To create a new panel, open the Panels page on the Ambient settings and click the New Panel button.

An empty panel can be dragged anywhere and you can find some of its settings on the Name & Look and Behaviour tabs. If you want to place the panel on a screen border the Attached to Borders option makes it easier. The Alpha option controls the transparency of a panel, but it only works if the Enhanced Display option for the Ambient screen enabled and working. The same applies to the Hide Dragbar option as well.

Programs can be added to the panel by dragging and dropping their icons to the panel list to the wanted position on the list tree, or to the panel itself. Items in the panel list can be rearranged by drag and drop too.

Available Panel Objects are listed on the right-hand side and they can be dragged and dropped to any position on the panel tree. All items on the panel may have their own settings, which are shown when an item is clicked once with the left mouse button. In this example picture a new sub panel has been created and its icon image is being changed to a custom one.

If you want to clone the color settings from the main panel to a sub panel, you can use the MUI clipboard to temporarily store a setting. Drag & drop the wanted color button to the clipboard button.

Then activate the sub panel settings and drag & drop the clipboard button to the sub panel's color button.

And here's a picture of the created panel with its sub panel in action. Remember to click the Save button. The panels also have a context menu that can be accessed with a right click. You'll have quick access to the panel settings and some other options there.

Window
Ambient windows are very configurable and users should at least check the buttons available for the toolbar. Just adding a few buttons can make a difference in usability. The buttons and other items can be dragged from the Available Buttons list to the Current Toolbar group, and vice versa to remove them from the toolbar. All changes are updated in real time to any open Ambient windows.

In this example picture Makedir and Delete buttons are separated with the Space button, and they have been added into a row with other buttons. Also the Bookmarks button has been added as the last item on the toolbar. It always stays at the right border no matter how big a window is, because it's been added after the Flexible space button.

Keyboard
Built-in Command Hotkeys
Check the Ambient hotkeys from this section and change them to your liking. If you have a laptop without the numeric keypad, you should change hotkeys which are using numpad combinations by default. I, for example, am used to having the Cycle Mode option on the key above the tab key and the Cycle Submode option when the same key is pressed with the shift key. It feels somehow quicker to use them from there than from the numeric keypad with a standard keyboard too.
Custom Command Hotkeys
Practically any functionality can be added to custom hotkey definitions. This might be a bit advanced topic, but let's show few definitions which will improve the usability.
A new Ambient hotkey can be created by clicking the Add a Hotkey button. The first text field is for the name of the hotkey and it can be anything. The second text field is the actual keyboard combination to activate a function. The Edit Command button is used to define what actually happens when you press the hotkey in Ambient.
Let's create two hotkeys which can be used to copy selected files' names as text to the clipboard, with and without the preceding path.
- Click the Add a Hotkey button, define the name as Copy name with path and the hotkey combination to ralt c. Click the Edit Command button and the Add button on the Action Editor window. Change the action type from AmigaDOS to Internal, type in the command copyselectiontoclipboard VIEWID=%Si FULLPATH, and press the enter key. Click the Ok button.
- Click the Add a Hotkey button again, define the name as Copy name and the hotkey combination to rshift ralt c. Click the Edit Command button and the Add button on the Action Editor window. Change the action type from AmigaDOS to Internal, type in the command copyselectiontoclipboard VIEWID=%Si, and press the enter key. Click the Ok button, save the Ambient settings, and you're done.
If you now select any files on an Ambient window and press the ralt c key combination, the selected file names with their full paths get copied to the clipboard and are available to be pasted to any other application. The rshift ralt c combination copies pathless file names to the clipboard.


Another example which will extract any selected archive file to the ram disk with the lshift control e combination.
- Click the Add a Hotkey button, define the name as Extract to RAM and the hotkey combination to lshift control e. Click the Edit Command button and the Add button on the Action Editor window. Leave the action type to AmigaDOS, type in the command XADUnFile %sp RAM: , and press the enter key. Click the Ok button.
Screenbar Modules
Screenbar modules are plugins which can populate the empty area on the screen tittle bar with some useful information and functionality. The modules are visible on every (MUI) screen, which makes them more useful than, for example, Panel Objects. Panel Objects are only seen on the Ambient screen and can be left under some other windows more easily.
Screenbar modules can be enabled and disabled from the screen depth gadget menu. The menu also contains options to arrange order of the modules and to change their settings. The menu can be accessed by right clicking, or with a long left press, over the screen depth gadget.

Let's have a look at how to configure a few modules. Enable the CPU Monitor, Drivelamps, and Memory modules by, for example, multiselecting them at once. Reopen the screen depth gadget menu, select the Settings... option, and select CPU Monitor from the settings list. The CPU Monitor module is a bit narrow by default, so let's increase its width a little.

The Drivelamps module has more configuration options. Enable the Show lamp option for usbscsi.device if you want to see access indicators for both HD and USB drives. The default look doesn't seem to be that good for two lamps, but you can tune it a bit. Disabling the frame from the Look group (select None) and selecting the recessed frame for the Lamp Look group does some wonders already. You can also adjust the spacing options, if the lamps don't seem to match with the height of the CPU Monitor or other modules.

The Memory module shows free memory in percents by default, but it can be changed to other types too. Click the popup button on the Information line to see the options. The information line can have any text, and for example a %mfMB free line would show free memory in megabytes followed by the "MB free" text.

MUI Settings
MUI is the default GUI toolkit of MorphOS and its looks and behaviour can be changed in almost every aspect. Its basic philosophy is to offer as much freedom as possible to users by taking away as much work as possible from programmers. A user can modify the looks of MUI programs very drastically both globally and per program. It can be done by changing single settings or by loading complete themes (presets).
The most important thing for a new user is to understand the difference between the global settings and settings of individual programs.
The global settings are the default settings which will apply to any program using MUI. The global settings can be changed by selecting the Settings->MUI... option from the Ambient's pulldown menus or by double clicking the SYS:Prefs/MUI icon.
Each MUI program can also have its own MUI settings which will override the global settings, but be careful when changing for example the looks of an individual program. If you decide to change the global theme later, the changes made to the individual programs might not fit the global theme anymore. The MUI settings of a program can be found on its pulldown menu or from the window's popup gadget menu. Ambient's MUI settings are found from the Settings->Ambient MUI... option in the Ambient's pulldown menus.
Let's change a couple of options in the global MUI settings as an example. Open the global MUI settings window.

The default ghosting effect for buttons is a bit old-fashioned raster effect and it will look much better with just reduced visibility. Select the Buttons page and click the None option for the ghosted gadgets. The visibility can be changed with the slider below, but the default value will be fine too. You'll see the changes in real time on any MUI program, the Test button is a bit obsolete with the latest MUI. I also like to make the Active Gadgets Border a bit smaller than the original size. Click the Save button when you're satisfied.

The Settings button in the top left corner opens a popup menu with options to reset the settings or load different presets.
All MUI settings get saved to the ENVARC:MUI/ directory. If you mess too much with settings for individual programs, the last resort to revert the settings to default is to remove the corresponding settings files from that directory or restore them from a backup.
Hiding the Boot Image Partition on Macs
On Macs you'll have a small HFS formatted partition which contains a few files needed to boot the system. The files are only used by Open Firmware at boot time and the user or MorphOS itself don't normally need them for anything. Open Firmware, as well as the MorphOS update wizard, can access the partition even if it's not mounted on MorphOS. If we disable the auto mounting of it, our desktop will look a bit cleaner and the crucial boot files will then be safe from accidents as well.
Launch the Tools/HDConfig program and click on the small HFS partition. Its name should be DH0: if the system is installed with the default partition layout. Disable the Automatically mount partition option and click the OK button.

Click the Save button which is in the red area on the left side and accept the changes.

Next time you boot the system, the partition isn't shown on the desktop. If you need to access it later for some reason, it can be mounted temporarily with the Tools/Mounter tool.

Arranging the Drive Icons
The drive icons can be dragged to a different order and then saved to their positions by selecting the Snapshot option from the right click contextual menu. If the Ram Disk icon is dragged to the leftmost position and snapshot, it will appear at that position after a reboot and unsnapshot icons appear next to it.
Installing, Updating, and Configuring Essential Software
Checking the Network Connection
Before continuing to installing new software, let's check if your machine is properly connected to the Internet.
Open the shell by selecting the Ambient->New Shell... option from the Ambient's pulldown menus, or by pressing rcommand n keyboard combination or doubleclicking the SYS:Tools/MUI Shell icon.

Check the Internet connection by pinging some hostname on the Internet. Type for example ping www.google.com on the shell window. If you get replies from the host, the connection is OK and you can proceed by pressing CTRL C to quit the Ping command and closing the shell window. If you don't get any replies with time values, quit the pinging by the CTRL C combination and read the Configuring a Network Connection tutorial.

Installing Grunch
Grunch is an advanced software package manager, which can install, update, and uninstall software. It's a good starting point for new users and I'd advice everyone to check what it has to offer before visiting other sites for more software.
Start Odyssey Web Browser from SYS:Applications/OWB/OWB and download Grunch from its homepage or from the MorphOS Files site. Save the Grunch.lha archive file to any location, for example to Work partition or to Ram Disk. The archive isn't needed after the installation.

Close the browser and use Ambient to browse to the location where you saved the Grunch.lha file. Double click the archive, open the Grunch directory, and double click the Grunch.install file to start the installer script. Running an installer directly from the unpacked archive is a bit of a shortcut which might not work with all programs, but let's demonstrate it anyway. The traditional and more failproof way would be to unpack an archive file to a temporary location and then run the installer script from an unarchived directory. Read more about installing third party software here.

Click the Next button and select the destination location. The System:Applications path is OK unless you want to keep the bundled software and 3rd party software strictly separated. In that case you could make a new Applications directory on the Work partition, for example.

After the installation has finished, browse to the location where you installed the program and double click the Grunch icon. Grunch starts, but you'll have to wait a little while it does its initial checks and updates.

Before using the program any further, check the Grunch preferences. Select the Settings->Grunch... option from the pulldown menus and open the Miscellaneous tab. I'd change the Temporary Directory path to somewhere else than to your system partition. If you have enough memory, you could have it even on the Ram Disk, but a temporary directory on the Work partition would be a safe bet.
Click the file requester button at the end of the line to browse to the wanted location. The : button shows the available volumes, and you can also create new directories from the right click contextual menu on the file requester.

You should check the Path tab next, and think twice if you want to change them from the default paths. The default paths are OK if you think that all 3rd party and bundled software can reside mixed in the same directories and if you have enough free space on the system partition. But if you like to keep 3rd party and bundled software separated and have the system directories as clean as possible, change the paths now. You could make suitable directories on the Work partition, for instance.

When you're happy with the settings, click the Save button.
The Grunch icon can also be dragged to a panel for quick access later.

Installing Software with Grunch
rexxsyslib.library
The rexxsyslib.library file enables the ARexx scripting language support on your system and it should be installed as early as possible. Many programs and their features rely on a working ARexx environment. Select it from the list and click the Install button on Grunch. You may need a reboot before it'll be in use.

Updating OWB
MorphOS usually comes with a bit old version of the OWB browser and you should check for a newer version. Select OWB from the list and click the Check button.

You probably have an old version, so click the Update... button and wait for it to finish.

You could also change the mode to Update.

MPlayer
MPlayer is hands down the best video player on MorphOS, just install it. It also works as an audio player with comprehensive support for different formats.

PowerSDL
PowerSDL libraries are required for many software ports from other platforms. It's better to install them as well.

CRABUM
CRABUM lets you to customize the pulldown menus on Ambient. It's quite handy for adding some hidden but quickly available features and shortcuts. We'll need this for some later examples.

Configuring the Installed Software
Configuring Odyssey Web Browser
Here are few examples or suggestions for the initial configuration of OWB. Do the steps you like.
Downloading More Suitable Fonts for OWB
The fonts provided with MorphOS aren't designed with web usage in mind and it's better to download certain Microsoft fonts for the browser. Luckily it's an easy job to do, because there's a downloader script included in the OWB's directory.
Open the SYS:Applications/OWB directory and double click the Download Fonts icon.

Click Yes on the requester and wait patiently for the downloading and installing of the fonts. The output window closes when the process is finished.

OWB initializes the fonts on the first run, but it will start much quicker next time.

Making OWB to Use Its Own Screen
A browser is usually an application people want to use in a full size window and on Amigaish systems it makes sense to put it on its own screen. When used on a separate screen it leaves more space for other programs on the Ambient screen, and you don't have such a hassle when handling them all. Bringing screens to front is also a very quick operation, you'll never see any slowdowns like on other systems where you reopen full size windows from taskbars, for example.
You could send a program to a new screen with the "Jump to Screen -> New" option from the window popup gadget, but it's mainly designed for temporary usage. Let's do the configuration more proper way instead.
Launch OWB, click on the window popup gadget, and select MUI Settings.... Another way to access the MUI settings would be from the Settings->MUI... pulldown menu option when OWB's window is active.

Open the Screen page, select the customized public screen from MUI screen database option, and click the New... button.
The Edit Screen window opens. The name field is for the screen name and the title field for the screen title text. They can be anything you want, but it's better to keep them informative. OWB would be a good screen name now and Odyssey Web Browser for the title. Check if the default screen mode is what you want. Be also sure that the Close automatically option is enabled.
It might be a good idea to disable the Enhanced Display option, because it doesn't give that much advantage with full screen applications. Graphics memory usage will also be lower, and it might be crucial to save some graphics memory on systems with less than 128 MB memory on the graphics card. Read more about how to reduce graphics memory usage here.
Click the Ok button on the Edit Screen window and the Save button on the MUI Settings window.
Note: this method can be used with all MUI programs to put them on their own screens, from shell windows to small utilities, bigger applications, and games. I prefer to use the ShowGirls image viewer and other bigger applications on their own screens. Several MUI programs can also share the same custom screen, as it isn't limited just to a program per screen. You could for example group some network programs to one screen, and some other programs to another screen, etc.

The OWB window doesn't probably have optimal size and position on the newly created screen. Right click over the zoom gadget and select the Maximize option or if you configured the zoom gadget as suggested earlier, click the zoom gadget twice. The maximize option leaves the screen title bar visible, but otherwise resizes the window to full screen size. Select the Snapshot option from the window popup gadget to save the window position permanently.


Open PDF Files Automatically
OWB's MIME Types settings can be used to configure automatic actions to files of certain types. Here is an example of how to show PDF files automatically with the VPDF application when clicked on the browser.
Open OWB's settings from the Settings->Preferences... pulldown menu option and select the MIME Types page. Click the Add button and fill in the information below like this:
MIME Type: application / pdf
Extension: pdf
Action: External Viewer, Viewer: SYS:Applications/VPDF/VPDF, and the last unnamed field: %f
Click the Save button.
If you now click a PDF file on a web page, the file is downloaded to a temporary location and shown on VPDF automatically.

Getting YouTube Videos to Play Better on the Browser Window
YouTube videos should play on OWB by default, but there are a thing or two to note.
Playing videos in a small embedded window is a very CPU intensive task and not quite smooth on most systems. Moving the video playback from the embedded mode to the overlay mode helps the task hugely. This can be achieved with the YouTube Fullscreen Fix script. Videos will be shown in a nearly fullscreen window using the overlay functions and the CPU load may drop from 100% even to 30% on a G4 system, resulting in perfectly smooth playback of course.
Download the latest script from http://fabportnawak.free.fr/owb/scripts/YouTube_Fullscreen_Fix.js (YouTube changes its internals randomly and that's why the script on the MorphOS ISO is probably old already. Grunch also may have an old version and manual installation is highly advisable).
Copy the downloaded script to the System:Applications/OWB/Scripts directory.

Open the Scripts window from the Windows->Scripts... pulldown menu entry on OWB.

Click the Add button on the Scripts window and select the YouTube_Fullscreen_Fix.js file.

Make sure that the Enable setting is chosen and close the window. A restart of the browser is needed to activate the script, but after that you should be able to get any YouTube video to the smooth fullscreen mode by clicking the "fullscreen" or "large player" buttons on the video after the video playback has started. If you're watching a video embedded on some other external site, click the settings button instead. Double click the fullscreen video to get it to the embedded mode again.

Content Blocking and YouTube
If you have enabled the Content Blocking (AdBlock) option on the OWB settings, YouTube videos with ads will also get blocked. You can make a rule to the content blocking settings to allow those videos to be shown.
Open Windows->Content Blocking... from OWB's pulldown menus, click the Add button, and write youtube.com to the Rule line, and close the window.

Configuring MPlayer
General Options
The default configuration of MPlayer is quite fine, but here are a few options I like to set myself. Start MPlayer in the GUI mode by double clicking the GMPlayer icon in the MPlayer directory. There's just one MPlayer executable, but two icons with different tooltypes to start the program with or without the GUI mode.
With default options MPlayer scales the played video to fit the current window dimensions which typically leaves big empty borders around the video. To get the window dimensions to change with the video dimensions, select the Video->Window Dimension->100% option, and Settings->Save to save it as a default setting.

Open the Preferences window by selecting the Settings->Preferences... option from MPlayer's pulldown menus. There are some settings to consider.
The Audio Driver has two audio output options for AHI to choose from. The default ahi option outputs the audio through the Music Unit, which gives the best audio quality, but blocks simultaneous audio from any other sources. The ahi_dev option uses the device mode which can be shared with the other sources, but it results in a slight decrease in the audio quality. So, if you want to be able to watch videos while some other program, like a music player, would still continue with audio output, select the ahi_dev option.
If you don't like any usage data gathering, disable the Remember last visited path option :)

Setting MPlayer as the Default Player on Ambient
MorphOS doesn't have any default player for videos and double clicking a video file from Ambient results in an error requester. MPlayer can be set as the default video player by editing the Ambient MIME type settings.
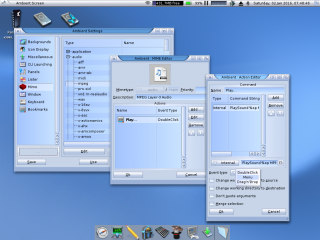
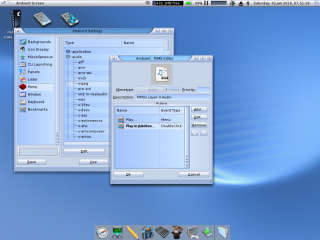
Open the Ambient Settings window and the Mime page. With the built-in MIME editor you can add different kinds of actions for different file formats or classes. Let's add MPlayer as the default player for all video files, not just for some individual video formats.
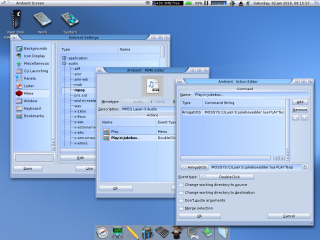
Select video from the right-hand side list tree and click the Edit button. Click the Add button on the MIME Editor window.
In the Action Editor window type a name for the action, for example Play, and click the Add button on that window too.
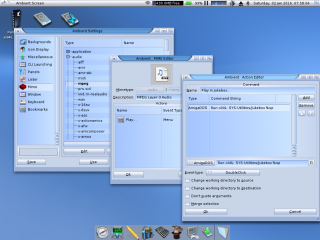
Change the AmigaDOS command to Run >NIL: SYS:Applications/MPlayer/MPlayer -gui 1 %sp (change the path to the MPlayer executable if you have it in a different location) and change the Event type to DoubleClick. Note: the -gui 1 option, which starts MPlayer in the GUI mode, has to be written in lower case, having it in upper case doesn't work!

Click Ok, Ok, and Save buttons.
If you now double click a video file in Ambient, it gets played on MPlayer. You can also see the Play option in the contextual menu when right clicking the video file.


You can add several actions as contextual menu events if you want to have more options for opening videos. Only imagination is the limit, and you can for example have contextual menu entries to start MPlayer playback with filters skipped (use the -lavdopts skiploopfilter=all option to speed up the video playback a little) and have an option to convert the video with mencoder etc.
Creating Menus with CRABUM
You can add custom pulldown menus to Ambient with ARexx scripts created by the CRABUM program. It's a good way to launch programs or scripts which you don't want to have on panels. Installation of rexxsyslib.library is required.
Let's create an Edit menu with options to edit different system startup scripts. Double click the CRABUM icon from the SYS:Utilities/CRABUM directory if you installed it with the default options.
- Click the Menu button to add a new menu and change its title to Edit.
- Click the Item button to add a new item under the created menu.
- Type User-startup to the title field and Ed S:user-startup to the AmigaDOS command line.
- Create an another item by clicking the Item button.
- Type User-network-startup to the title field and Ed S:user-network-startup to the AmigaDOS command line.
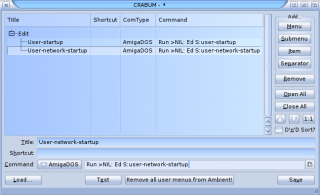
- Click the Save button to save the resulting ARexx script.
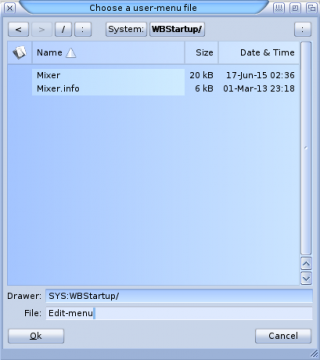
- If you save the file to the SYS:WBStartup drawer, it will be launched automatically at boot time. Enter a suitable name for the file, for example Edit-menu. Click the Ok button.


After a reboot (or doubleclicking of the file) you'll have the new Edit menu on the Ambient pulldown menus and you can easily open the system files for editing.

More Configuring
Synchronizing the Clock with an Internet Time Server
The system clock can be synchronized manually from the MorphOS Preferences application by clicking the Set date and time using the Internet button in the Time preferences.

There's also the SetClockNTP shell command which can be launched manually or automatically at boot time. To synchronize the time every time the system starts edit the S:user-network-startup file and remove the semi-colon from the SetClockNTP line.
To edit the S:user-network-startup file open the shell (or the Execute Command prompt) and type Ed S:user-network-startup, or open the System partition, select the All Files mode, browse to the S directory and select the Edit... option from the right click contextual menu. Or if you configured the Edit menu with CRABUM earlier, use it now.

Configuring the Shell
Editing the Shell-startup file
The shell can be customized with the shell-startup file, but by default the file is only found in a MorphOS system directory where user shouldn't do any modifications. It must be copied to user directories first to make any changes to it. Open a new shell window and type Copy MOSSYS:S/shell-startup SYS:S/shell-startup, and then edit it for example with the Ed SYS:S/shell-startup command. The shell-startup file is executed every time a new shell window is opened.

Adding Paths
There are some useful shell commands around the installed system which aren't in the system's search path and you'll have to enter their complete paths when using them. Adding their locations to the search path allows them to be run just by their names, which is much more convenient.
Here are few suggestions to add to the SYS:S/shell-startup file (remember the previous step first!). Or if you want them to be available globally in all occasions, they can be added to the S:user-startup file instead.
- Path SYS:Applications/RemoteShell/Files ADD adds SSH related commands like scp, sftp, ssh, etc to the search path.
- Path SYS:Applications/OWB/Datas ADD adds wget to the search path.
- Path SYS:Applications/MPlayer ADD adds MPlayer and mencoder to the search path if you have installed MPlayer. Change the path if you have installed it elsewhere.
Configuring the GUI
There are many buttons and hotkeys to add to the shell window besides the default ones. Check the preferences by selecting the Settings->Edit Prefs... option from the Shell's pulldown menus.
Available functions can be dragged to Hotkeys or Buttons lists and the changes are seen in real time on the shell window.

You may also want to set the default window size and position for new shell windows from the Settings tab. Click the Get from window button to get values from the current shell window.

Remember to save the modifications from the Settings menu.

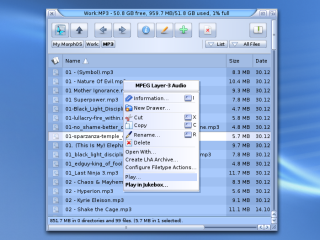
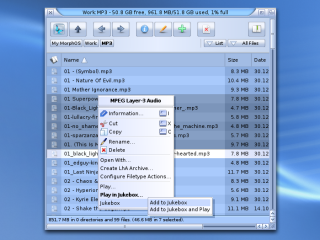
Setting Jukebox as the Default Player for MP3 Files
If you double click an MP3 file from an Ambient window, it is played with the very simple internal player. Here are two solutions to change the default player to the more advanced Jukebox music player. Ambient's internal player is still left to context menu as an option.
Simple Solution
A simple solution is just to create a new mpeg audio MIME type definition which just launches the Jukebox player with the double clicked filename as an argument.
- Open the Mime page in the Ambient settings, select audio->mpeg from the list tree, and click Edit.
- Select Play... and click Edit.
- Change Event type to Menu and click the Ok button. Ambient's internal player is now left as an optional context menu entry only.
- Click the Add button on the MIME Editor window.
- Type Play in Jukebox... to the name string.
- Click the Add button and specify the AmigaDOS command to Run >NIL: SYS:Utilities/Jukebox %sp
- Set the Event type to DoubleClick.
- Click Ok and you should see this in the MIME Editor window.
- Click Ok and Save buttons. If you double click an MP3 file now, Jukebox starts and plays the clicked file. There are also two entires in the right click contextual menu and the option which is used for the double click action is written in bold.


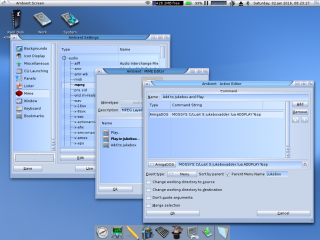
Advanced Solution
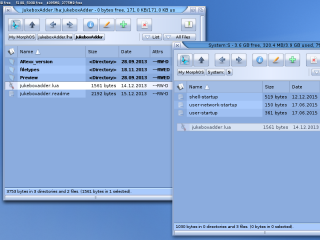
An advanced solution is to use the third party JukeboxAdder script. It will give more flexible options to add files to Jukebox and we'll learn how to configure submenus to the context menus. There are shortcuts to install the script if you read the documentation in the archive, but let's do this manually to learn the configuring method better. It will be helpful in the future when you will be configuring any other filetypes.
- Download the script archive from Aminet or from MorphOS Files.
- Copy the jukeboxadder.lua file from the archive to the SYS:S/ directory.
- Open the Mime page in the Ambient settings, select audio->mpeg from the list tree, and click Edit.
- Select Play... and click Edit.
- Change Event type to Menu and click the Ok button. Ambient's internal player is now left as an optional context menu entry only.
- Click the Add button on the MIME Editor window.
- Type Play in Jukebox... to the name string.
- Click the Add button and specify the AmigaDOS command to MOSSYS:C/LuaX S:jukeboxadder.lua PLAY %sp
- Set the Event type to DoubleClick.
- Click Ok and then click Add again in the MIME Editor window to create more ways to add files to Jukebox from the context menus.
- Type Add to Jukebox to the name string.
- Click the Add button and specify the AmigaDOS command to MOSSYS:C/LuaX S:jukeboxadder.lua ADD %sp
- Set the Event type to Menu, enable the Sort by parent option, and type Jukebox to the Parent Menu Name string. This will create a Jukebox named submenu to the context menu and places the new Add to Jukebox option there.

- Click Ok and Add once again to create the last entry.
- Type Add to Jukebox and Play to the name string.
- Click the Add button and specify the AmigaDOS command to MOSSYS:C/LuaX S:jukeboxadder.lua ADDPLAY %sp
- Set the Event type to Menu, enable the Sort by parent option, and type Jukebox to the Parent Menu Name string.
- Click Ok, Ok, and Save. Now you can see more options in the context menu for MP3 files and double clicking will always clear the previous songs and plays the new song immediately.


It is also possible to add the same functionality for context menus of directories if you want to be able to add whole directories to Jukebox at once. There's a special internal -> x-morphos-globalaction-directory MIME type which can be used to add context menu entries for all directories. Repeat the previous steps (6-18) for it, but make all Event types to use the Menu option (in step 9 too).


