Difference between revisions of "Preparing an Amiga Hard Drive"
From MorphOS Library
| (2 intermediate revisions by the same user not shown) | |||
| Line 2: | Line 2: | ||
| − | Here's how to prepare an Amiga hard drive, in this case a CF card in a USB card reader: | + | Here's how to prepare an Amiga hard drive, in this case a CF card in a USB card reader (note: Direct SCSI versions of filesystems don't seem to work on USB): |
# Launch the [[Tools/HDConfig | HDConfig]] tool. | # Launch the [[Tools/HDConfig | HDConfig]] tool. | ||
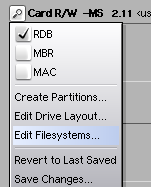
# Change the partition layout type to RDB for the drive to be prepared.<br />[[File:AmigaHD1.png]] | # Change the partition layout type to RDB for the drive to be prepared.<br />[[File:AmigaHD1.png]] | ||
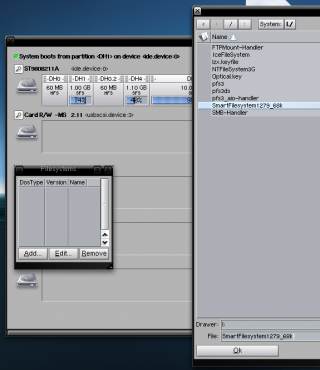
# Click "Edit Filesystems..."<br />[[File:AmigaHD2.png]] | # Click "Edit Filesystems..."<br />[[File:AmigaHD2.png]] | ||
| − | # Click "Add..." and select a 68k filesystem you have copied somewhere on your HD, it doesn't need to be in L: either. The filesystem will be written to the destination disk's RDB block and it won't be needed to reside in any directory after it.<br />[[File:AmigaHD3.png|320px]] | + | # Click "Add..." and select a 68k filesystem you have copied somewhere on your HD, it doesn't need to be in L: either. The filesystem will be written to the destination disk's RDB block and it won't be needed to reside in any directory after it. In this example I use the SFS version found [http://strohmayer.org/sfs/files/SFS_1.279_68k.lha here] (it was renamed to be better recognizable).<br />[[File:AmigaHD3.png|320px]] |
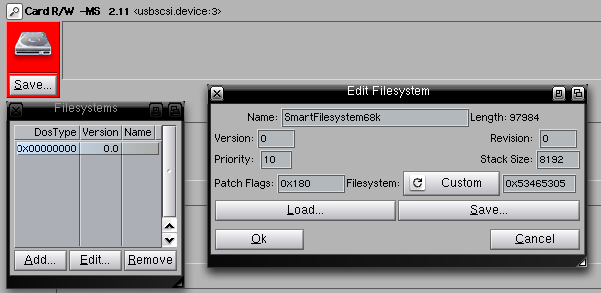
# Edit filesystem properties on the window which did open after you selected the filesystem file. The most important thing is to change the filesystem name to "Custom" and edit its identifier to something which isn't used on the native filesystems. In this example I'm adding the 68k SFS and change the identifier to SFS/05 which is in hex 0x53465305. the "05" value is just big enough to not mess with the usual "00" or OS4's "02" etc. Basically you can use any three letter and two number identifier here (the [[Utilities/Keystroke | Keystroke]] utility is a good help to get the hex values).<br />[[File:AmigaHD4.png]] | # Edit filesystem properties on the window which did open after you selected the filesystem file. The most important thing is to change the filesystem name to "Custom" and edit its identifier to something which isn't used on the native filesystems. In this example I'm adding the 68k SFS and change the identifier to SFS/05 which is in hex 0x53465305. the "05" value is just big enough to not mess with the usual "00" or OS4's "02" etc. Basically you can use any three letter and two number identifier here (the [[Utilities/Keystroke | Keystroke]] utility is a good help to get the hex values).<br />[[File:AmigaHD4.png]] | ||
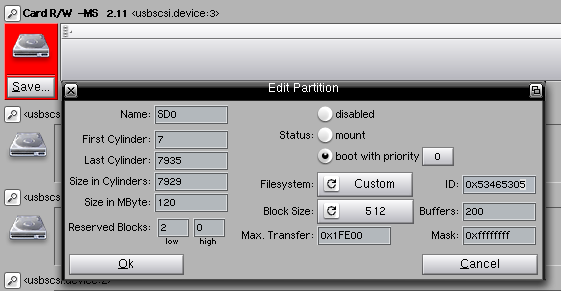
# Save the changes and create a new partition. Change partition's filesystem to "Custom" and use the same identifier you used before, in this case 0x53465305. If you're going to use the drive in the internal IDE port on Amiga, remember to change the max transfer value to 0x1FE00 ([http://eab.abime.net/showthread.php?t=45491 Why this value?]).<br />[[File:AmigaHD5.png]] | # Save the changes and create a new partition. Change partition's filesystem to "Custom" and use the same identifier you used before, in this case 0x53465305. If you're going to use the drive in the internal IDE port on Amiga, remember to change the max transfer value to 0x1FE00 ([http://eab.abime.net/showthread.php?t=45491 Why this value?]).<br />[[File:AmigaHD5.png]] | ||
# Save the changes and it might be better to replug the drive. | # Save the changes and it might be better to replug the drive. | ||
| − | # Do a quick format to the created partition(s). | + | # Do a [[Tools/Format | quick format]] to the created partition(s). |
The drive should be ready to be plugged in on an Amiga computer. There's no need to have the filesystem as a visible file anywhere now on, because the filesystem has been saved to the drive's RDB and it'll work anywhere you plug the drive in. | The drive should be ready to be plugged in on an Amiga computer. There's no need to have the filesystem as a visible file anywhere now on, because the filesystem has been saved to the drive's RDB and it'll work anywhere you plug the drive in. | ||
Latest revision as of 06:54, 7 March 2016
MorphOS supports Amiga's RDB partition layout and 68k filesystems also do work under the internal 68k emulation. It means that you can use and prepare Amiga's hard drives directly under MorphOS without any external emulators. You can connect the drives to the internal IDE or SATA bus, or externally to USB, for example. MorphOS machines are much faster than the original Amigas and that's why it's usually much more comfortable to prepare, copy, and install stuff on the MorphOS than on a real Amiga. MorphOS is also fully compatible with all the Amiga's file attributes, everything will be preserved when unpacking and installing software.
Here's how to prepare an Amiga hard drive, in this case a CF card in a USB card reader (note: Direct SCSI versions of filesystems don't seem to work on USB):
- Launch the HDConfig tool.
- Change the partition layout type to RDB for the drive to be prepared.

- Click "Edit Filesystems..."
- Click "Add..." and select a 68k filesystem you have copied somewhere on your HD, it doesn't need to be in L: either. The filesystem will be written to the destination disk's RDB block and it won't be needed to reside in any directory after it. In this example I use the SFS version found here (it was renamed to be better recognizable).
- Edit filesystem properties on the window which did open after you selected the filesystem file. The most important thing is to change the filesystem name to "Custom" and edit its identifier to something which isn't used on the native filesystems. In this example I'm adding the 68k SFS and change the identifier to SFS/05 which is in hex 0x53465305. the "05" value is just big enough to not mess with the usual "00" or OS4's "02" etc. Basically you can use any three letter and two number identifier here (the Keystroke utility is a good help to get the hex values).
- Save the changes and create a new partition. Change partition's filesystem to "Custom" and use the same identifier you used before, in this case 0x53465305. If you're going to use the drive in the internal IDE port on Amiga, remember to change the max transfer value to 0x1FE00 (Why this value?).
- Save the changes and it might be better to replug the drive.
- Do a quick format to the created partition(s).


The drive should be ready to be plugged in on an Amiga computer. There's no need to have the filesystem as a visible file anywhere now on, because the filesystem has been saved to the drive's RDB and it'll work anywhere you plug the drive in.