Subclassing List Class
From MorphOS Library
Grzegorz Kraszewski
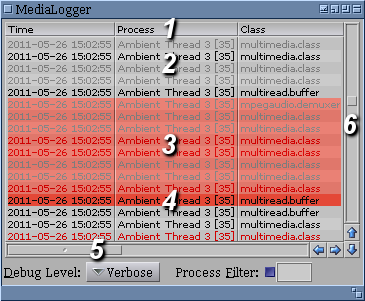
List class is one of the most complex MUI classes. Its purpose is to display data as a list or table. Objects of List can be found in almost any MUI application. An example shown below is a List object from the Media Logger application, which shows Reggae event log. The event log list is the main item of the program window. The most important visible elements of a List object are marked with digits.
- A bar of column titles. This is an optional element, used usually when a list has multiple columns.
- Data rows. Usually contain textual information. Simple formatting like italicizing, emboldening, color change (shown on the example) may be applied. List class does not allow for more advanced formatting, for example font cannot be changed. There is a possibility for adding images however.
- Selected data rows. Selection can be done with mouse, keyboard, or from inside application using object attributes. There is a possibility of optional multiselection.
- The active row. It is selected as well usually, however in therory an item can be active, but not selected. There is even a separate setting in MUI preferences for that case.
- Horizontal scroller. Used when data do not fit horizontally. Horizontal scroller can be disabled, set to automatic (appears when needed), or always visible.
- Vertical scroller. Used when data do not fit vertically. The srcroller may be disabled.
Basic Usage
The simplest case of List class usage is a single column list containing plain text strings. Then, the simplest way to define these texts is a static array. Such a List object is a static one. An array of strings is passed to the object with MUIA_List_SourceArray attribute. The attribute may be used only as an argument for a constructor. The array may be for example declared as a global variable:
STRPTR ListItems[] = { "first", "second", "third", "fourth", NULL };
The array must be terminated with a NULL pointer. The object is created as follows:
ListObj = MUI_NewObject(MUIC_List,
  MUIA_List_SourceArray, (ULONG)ListItems,
  MUIA_Frame, MUIV_Frame_ReadList,
  MUIA_Background, MUII_ReadListBack,
  MUIA_Font, MUIV_Font_List,
TAG_END);
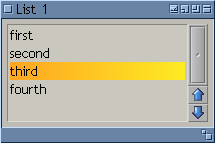
Except of MUIA_List_SourceArray attribute mentioned above, there are three attributes related to the object's appearance. They should be never omitted. MUIA_Frame defines the object frame. If not specified, the object will be frameless, which does not look good. There are two kinds of frame defined in the user preferences. MUIV_Frame_ReadList should be used for read-only lists (ones, which cannot be edited by user). Editable lists should have MUIV_Frame_InputList frame. In most of legacy Amiga GUI toolkits, read-only lists had recessed frames, while editable lists had embossed ones. Of course in MUI it is up to user, but on the application side the difference between two kinds of list frames should be maintained. The picture below shows an example appearance of a List object defined with the above code:
Setting the MUIA_Frame attribute of a List object to one of special values listed above, has an unexpected and undocumented sideeffect. The background for the object is set automatically according to the frame type. What is strange, this automatic setting cannot be overridden by passing MUIA_Background explicitly, the attribute is ignored.
A List object can change its both dimensions freely when a containing window is resized. For static lists, where the contents is known in advance, one can request that the object width is locked to the width of the longest item. It is also possible to lock the object height to the total height of all the items. To do this MUIA_List_AdjustWidth and MUIA_List_AdjustHeight attributes may be specified for the object construction. Both of them are boolean attributes, with the default value FALSE. Let's add them to our List object:
  MUIA_List_AdjustWidth, TRUE,
  MUIA_List_AdjustHeight, TRUE,
Now the list object dimensions are fixed. As the list is the only object inside the window, the window is no more resizable (there is no bottom bar and sizing gadget). As the list now always show all its items, the vertical scroller is superfluous. In theory it can be removed, specifying MUIA_List_ScrollerPos attribute as MUIV_List_ScrollerPos_None, but MorphOS 2.7 MUI seems to ignore it.
Dynamic Adding and Removing Items
It is obvious that a static list is useful only in rare cases. Usually items are added and removed with user actions or because of other external events. The simplest method for adding a list item dynamically is MUIM_List_InsertSingle. It inserts a single item in a specified position:
DoMethod(ListObj, MUIM_List_InsertSingle, (IPTR)"fifth", MUIV_List_Insert_Bottom);
When multiple items are to be inserted, it can be done in one go with MUIM_List_Insert. Items should be grouped in an array. Number of inserted items may be either given explicitly, or the array may be terminated with NULL item (similarly as for MUIA_List_SourceArray), then −1 is passed as quantity. These two ways are shown in the example below, both calls are equivalent:
DoMethod(ListObj, MUIM_List_Insert, (IPTR)ListElements, 4, MUIV_List_Insert_Bottom);
DoMethod(ListObj, MUIM_List_Insert, (IPTR)ListElements, -1, MUIV_List_Insert_Bottom);
For the first call, ListItems table does not need to have the NULL element at the end. Then, the first form may be used to insert any continuous fragment of a source array. Let's insert only the second and the third element of the array:
DoMethod(ListObj, MUIM_List_Insert, (IPTR)&ListElements[1], 2, MUIV_List_Insert_Bottom);
Słów kilka o pozycji wstawiania, która jest ostatnim parametrem obu omówionych metod. Pozycja ta może być podana wprost jako liczba, wtedy nowy element jest wstawiany nad elementem o podanym indeksie, przy czym elementy liczone są od 0. Oprócz tego istnieją cztery predefiniowane stałe:
MUIV_List_Insert_Top – wstawianie elementów od góry listy. Ten sam efekt można uzyskać podając 0 jako pozycję wstawiania i w istocie, stała ta ma wartość 0.
MUIV_List_Insert_Bottom – wstawianie elementów na dole listy.
MUIV_List_Insert_Active – wstawianie elementów nad elementem aktywnym (kursorem) listy.
MUIV_List_Insert_Sorted – wstawianie elementów w kolejności posortowanej.
Stosując te stałe, zwłaszcza przy wstawianiu tablic elementów, trzeba zwrócić uwagę na dwie rzeczy. Po pierwsze sposób wstawiania nie jest aplikowany do tablicy jako całości, a do każdego z elementów z osobna. Prowadzi to do zaskakujących z pozoru efektów. Np. wstawienie tablicy elementów z pozycją MUIV_List_Insert_Top spowoduje wstawienie ich w kolejności odwrotnej niż są w tablicy. Dzieje się tak dlatego, że najpierw wstawiany jest do listy pierwszy element tablicy, następnie drugi wstawiany jest nad nim, trzeci nad drugim i tak dalej. Dotyczy to również każdej pozycji podanej wprost jako liczba, natomiast nie dotyczy wstawiania na dole listy oraz wstawiania przed kursor (bo pozycja kursora będzie się zwiększać o jeden po każdym wstawionym nad nim elemencie).
Druga sprawa to sortowanie. Jeżeli chcemy mieć posortowaną listę, trzeba podawać MUIV_List_Insert_Sorted przy każdym wstawianiu elementów. Podanie bowiem tej stałej nie powoduje sortowania elementów, które na liście już są. W efekcie wstawiając „sortująco” elementy do listy, która nie była wcześniej posortowana, otrzymamy listę posortowaną fragmentarycznie. Jeżeli z jakichś powodów nie jest możliwe użycie MUIV_List_Insert_Sorted przy każdym wstawianiu, można, przed rozpoczęciem wstawiania „sortowanego”, posortować listę ręcznie, wywołując metodę MUIM_List_Sort(). Dla prostych list, jakimi się tutaj zajmujemy, zawierających łańcuchy tekstowe, kryterium sortowania to narastająca kolejność alfabetyczna. Niestety jest to kolejność według kodów ASCII liter, a więc wyrazy zawierające polskie znaki sortowane są nieprawidłowo, dotyczy to również wielu innych języków. Można to na szczęście zmienić, zostanie to omówione w drugiej części tego artykułu.
Usuwanie elementów z listy jest sprawą znacznie prostszą. Robimy to metodą MUIM_List_Remove(). Podobnie jak przy wstawianiu, pozycję elementu do usunięcia możemy podać wprost, albo skorzystać z jednej z kilku stałych. Stałe te są bardzo podobne do omówionych powyżej i pozwalają na usunięcie pierwszego, ostatniego i aktywnego elementu listy (można je znaleźć w dokumentacji klasy List w SDK). Dodatkowo mamy też stałą MUIV_List_Remove_Selected, która powoduje usunięcie wszystkich zaznaczonych elementów, jeżeli dana lista pozwala na wielokrotne zaznaczenie. To jedyny przypadek, w którym MUIM_List_Remove() pozwala na usunięcie więcej niż jednego elementu za jednym razem.
Każda operacja wstawiania i usuwania elementu powoduje odrysowanie obiektu listy, jeżeli ten jest aktualnie widoczny. Może to skutkować znacznym spowolnieniem wstawiania lub usuwania dużej ilości elementów. Radą na to jest skorzystanie z atrybutu MUIA_List_Quiet. Po ustawieniu go na wartość TRUE, MUI nie odrysowuje listy przy operacjach zmieniających ilość i/lub kolejność elementów. Rzecz jasna po zakończeniu tychże operacji należy z powrotem ustawić ten atrybut na FALSE. Oprócz tego warto pamiętać o metodzie MUIM_List_Clear(), która jednym pociągnięciem usuwa wszystkie elementy z listy. Jest to oczywiście znacznie szybsze rozwiązanie, niż usuwanie ich pojedynczo.


