Difference between revisions of "Multi-display"
From MorphOS Library
m (→Examples) |
|||
| (6 intermediate revisions by 2 users not shown) | |||
| Line 1: | Line 1: | ||
== Basics == | == Basics == | ||
| + | MorphOS has limited support for multi-display setups. On the hardware side there's multi-head support for selected Radeon R3xx cards and configurations on PowerMac G5, PowerBook, and iMac setups. It's also possible to use multiple individual graphics cards in specific setups. | ||
| − | + | On the software side, from a users' perspective, multi-display setups rely on the [[Fundamentals_of_MorphOS#Screens|screens]] concept, which is inherited from AmigaOS. Individual screens can be configured to be opened on individual displays/monitors. The Ambient desktop will always be on its own screen and it cannot be stretched over several screens, it's always displayed only on one monitor, but you can open other programs on other monitors quite freely and decide which program is displayed on which monitor. | |
| − | + | Neither is there a system provided way to move the mouse pointer to another screen by moving it over the screen borders, so it must be done by cycling the screens just as when using multiple screens on a single monitor setup. | |
| − | + | == Configuring == | |
| + | When booting a multi-display setup for the first time, the Ambient screen opens on the largest or first display it finds. The other display(s) should show a mirrored image of the Ambient screen, but it may fail dependant on monitor specifications. | ||
| + | |||
| + | Which screen is displayed on which monitor can be configured from the '''Screens preferences''' in the MorphOS [[Getting_Started#System_Settings|system settings]]. There you can edit existing screens or create whole new screens. | ||
| + | |||
| + | To change the monitor a screen is displayed on, double-clicking the corresponding entry in the screens list and the '''Edit Screen''' window should then open. | ||
| + | : [[File:GettingStarted_MorphOS_Preferences_Screens.png|500px]] | ||
| + | |||
| + | The '''mode list''' shows all the available screenmodes on the computer, and these can be selected for the screen that needs editing. Mode names start with the graphics cards' name. On single-display setups all modes have the same name, but on multi-display setups the mode names reveal on which monitor the mode will be shown. On multi-head setups (single card/chipset, but several outputs), names only differ by the number added at the end of the names. | ||
| + | : [[File:Multi-display_modes.png]] | ||
| + | |||
| + | == Examples == | ||
| + | === Configuring Ambient for the Internal Display on PowerBooks === | ||
| + | For example, on PowerBook5,9 modes for the internal display have the name '''Radeon9700Mob''' and modes for the external monitor have the name '''Radeon9700Mob.1'''. To set the Ambient screen to the internal display, you'd select the ''Radeon9700Mob 24bit 1680 x 1050'' mode when editing the Ambient screen settings. Available resolutions differ between PowerBook models, but you should always select a mode that is equal to the native resolution of your display. | ||
| − | == Configuring == | + | === Configuring a Program to Use the Other Display === |
| + | All MUI (the native GUI toolkit of MorphOS) programs can be configured to use a screen on any monitor. With non-MUI programs (legacy 68k programs mainly) it depends on whether a program has a specific setting for its screenmode. | ||
| − | + | Here's a tutorial on how to configure a MUI program to use its own screen: [[Getting_Started#Making_OWB_to_Use_Its_Own_Screen|Making_OWB_to_Use_Its_Own_Screen]]. Just remember to select a screenmode for the required monitor in this case. | |
| − | + | === Using Several Programs on a Single External Screen === | |
| + | If you want to keep things tidy by only having one screen per monitor, you can create a single external screen to accompany your Ambient screen, and spread regularly used programs between them. | ||
| − | To | + | To create the screen, click '''New''' in the Screens preferences. Fill the '''Name''' and '''Title''' fields, for example, with ''External'' and ''External Monitor'' texts. Select a screenmode that has an alternate mode name than your Ambient screen has (ending in .1, for instance). Click '''Ok''', and '''Save''' or '''Use''' to test out the available screen on your system. |
| − | : [[File: | + | : [[File:Multi-display_external_setup.png|550px]] |
| − | + | Now you can move (MUI) programs to that screen by selecting '''Jump to Screen -> External''' from the [[Fundamentals_of_MorphOS#Window_border_gadgets|window popup gadget]]. If you don't see the gadget, check the ''Windows'' page in the MUI settings to enable it. The next screenshots show how to move a Shell window to the external screen. | |
| + | : [[File:Multi-display_external_jump.png]] [[File:Multi-display_external_screen.png]] | ||
| − | + | Programs can also be set to use the external screen permanently, you don't have to make them jump around all the time after reboots. Open the program's own MUI settings by clicking the [[Fundamentals_of_MorphOS#Window_border_gadgets|window popup gadget]] and select '''MUI Settings...''', or by selecting the '''Settings -> MUI...''' pull-down menu option when program's window is active. Activate the '''Screen''' page and select ''External'' from the list. | |
| + | : [[File:Multi-display_mui_settings.png]] | ||
| + | Program windows can be saved to fixed positions on the screen by selecting the '''Snapshot''' option from the [[Fundamentals_of_MorphOS#Window_border_gadgets|window popup gadget]]. | ||
| + | Here's an example screenshot with several networking related programs snapshotted in fixed positions on the external screen. | ||
| + | : [[File:Multi-display_netscreen.png|550px]] | ||
== Usage == | == Usage == | ||
| + | Only one screen can be active at once, and both the mouse pointer and the active text input will be on that screen. | ||
| + | |||
| + | To change the active screen, and thus the display/monitor you work on, you'll have to ''cycle'' screens in the traditional Amiga/MorphOS ways. By default that can be done by pressing the '''lcommand m''' keyboard shortcut or by using the [[Fundamentals_of_MorphOS#Screen_Depth_Gadget|screen depth gadget]]. | ||
| + | |||
| + | The keyboard shortcut, or mouse action, can be freely configured from the [[Getting_Started#IControl|IControl]] preferences in the MorphOS [[Getting_Started#System_Settings|system settings]]. It's done by editing the '''Screen: To Back''' hotkey. | ||
| + | |||
| + | It's also possible to add several different hotkeys for each action. Here's an example screenshot where both ''lcommand m'' and double-click with the middle mouse button (wheel) will cycle screens. | ||
| + | : [[File:Multi-display_icontrol.png|550px]] | ||
| + | |||
| + | There are also some 3rd party programs, or ''commodities'', to cycle the screens in different ways. | ||
Revision as of 00:55, 17 November 2019
Contents
Basics
MorphOS has limited support for multi-display setups. On the hardware side there's multi-head support for selected Radeon R3xx cards and configurations on PowerMac G5, PowerBook, and iMac setups. It's also possible to use multiple individual graphics cards in specific setups.
On the software side, from a users' perspective, multi-display setups rely on the screens concept, which is inherited from AmigaOS. Individual screens can be configured to be opened on individual displays/monitors. The Ambient desktop will always be on its own screen and it cannot be stretched over several screens, it's always displayed only on one monitor, but you can open other programs on other monitors quite freely and decide which program is displayed on which monitor.
Neither is there a system provided way to move the mouse pointer to another screen by moving it over the screen borders, so it must be done by cycling the screens just as when using multiple screens on a single monitor setup.
Configuring
When booting a multi-display setup for the first time, the Ambient screen opens on the largest or first display it finds. The other display(s) should show a mirrored image of the Ambient screen, but it may fail dependant on monitor specifications.
Which screen is displayed on which monitor can be configured from the Screens preferences in the MorphOS system settings. There you can edit existing screens or create whole new screens.
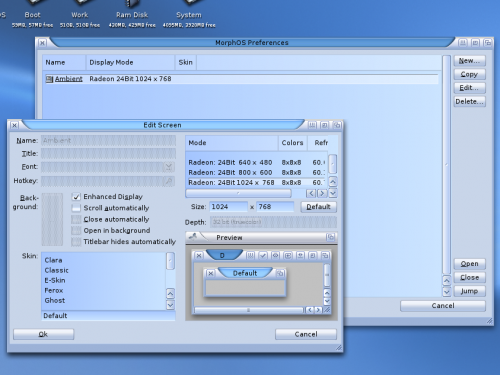
To change the monitor a screen is displayed on, double-clicking the corresponding entry in the screens list and the Edit Screen window should then open.
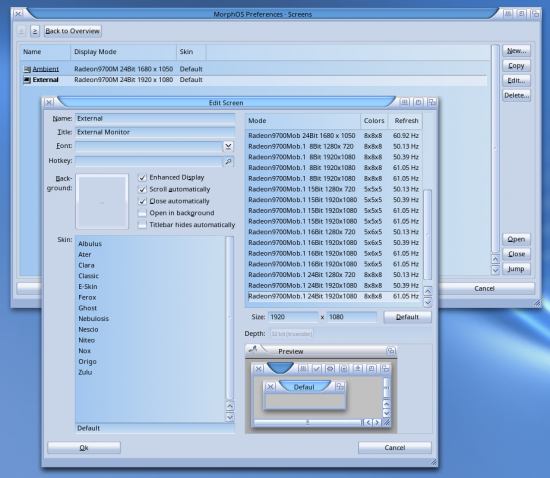
The mode list shows all the available screenmodes on the computer, and these can be selected for the screen that needs editing. Mode names start with the graphics cards' name. On single-display setups all modes have the same name, but on multi-display setups the mode names reveal on which monitor the mode will be shown. On multi-head setups (single card/chipset, but several outputs), names only differ by the number added at the end of the names.
Examples
Configuring Ambient for the Internal Display on PowerBooks
For example, on PowerBook5,9 modes for the internal display have the name Radeon9700Mob and modes for the external monitor have the name Radeon9700Mob.1. To set the Ambient screen to the internal display, you'd select the Radeon9700Mob 24bit 1680 x 1050 mode when editing the Ambient screen settings. Available resolutions differ between PowerBook models, but you should always select a mode that is equal to the native resolution of your display.
Configuring a Program to Use the Other Display
All MUI (the native GUI toolkit of MorphOS) programs can be configured to use a screen on any monitor. With non-MUI programs (legacy 68k programs mainly) it depends on whether a program has a specific setting for its screenmode.
Here's a tutorial on how to configure a MUI program to use its own screen: Making_OWB_to_Use_Its_Own_Screen. Just remember to select a screenmode for the required monitor in this case.
Using Several Programs on a Single External Screen
If you want to keep things tidy by only having one screen per monitor, you can create a single external screen to accompany your Ambient screen, and spread regularly used programs between them.
To create the screen, click New in the Screens preferences. Fill the Name and Title fields, for example, with External and External Monitor texts. Select a screenmode that has an alternate mode name than your Ambient screen has (ending in .1, for instance). Click Ok, and Save or Use to test out the available screen on your system.
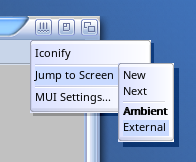
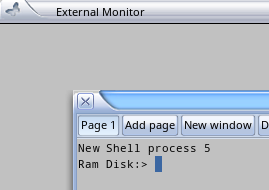
Now you can move (MUI) programs to that screen by selecting Jump to Screen -> External from the window popup gadget. If you don't see the gadget, check the Windows page in the MUI settings to enable it. The next screenshots show how to move a Shell window to the external screen.
Programs can also be set to use the external screen permanently, you don't have to make them jump around all the time after reboots. Open the program's own MUI settings by clicking the window popup gadget and select MUI Settings..., or by selecting the Settings -> MUI... pull-down menu option when program's window is active. Activate the Screen page and select External from the list.
Program windows can be saved to fixed positions on the screen by selecting the Snapshot option from the window popup gadget.
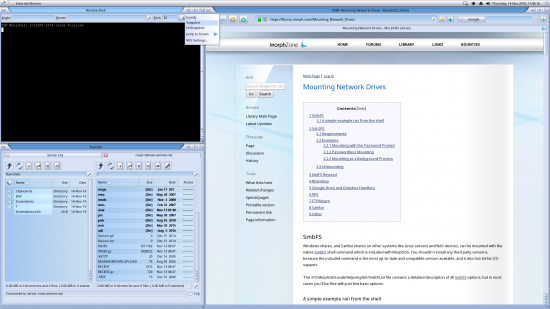
Here's an example screenshot with several networking related programs snapshotted in fixed positions on the external screen.
Usage
Only one screen can be active at once, and both the mouse pointer and the active text input will be on that screen.
To change the active screen, and thus the display/monitor you work on, you'll have to cycle screens in the traditional Amiga/MorphOS ways. By default that can be done by pressing the lcommand m keyboard shortcut or by using the screen depth gadget.
The keyboard shortcut, or mouse action, can be freely configured from the IControl preferences in the MorphOS system settings. It's done by editing the Screen: To Back hotkey.
It's also possible to add several different hotkeys for each action. Here's an example screenshot where both lcommand m and double-click with the middle mouse button (wheel) will cycle screens.
There are also some 3rd party programs, or commodities, to cycle the screens in different ways.
