Skanowanie ze SCANdalem
From MorphOS Library
Autor: Michał Żukowski
SCANdal jest graficznym interfejsem obsługi skanerów, wykorzystującym sterowniki standardu Betascan/SANE. Został napisany w MUI i przeportowany na większość systemów amigowych (MorphOS, AmigaOS 4.x, AmigaOS3.x, AROS). Celem jego stworzenie było dostarczenie użytkownikom darmowego oprogramowania (chociaż o zamkniętym kodzie źródłowym), które umożliwia efektywne wykorzystanie starych i nowych skanerów wykorzystując zaawansowane cechy obsługiwanych systemów.
Wymagania
SCANdal potrzebuje poniższych składników do działania: dla wersji dla AmigaOS
- MUI (Magic User Interface) version 3.8 or lub późniejszego
- urltext.mcc MUI class
dla MorphOSa <= 2.x
- wymagane jest zainstalowanie Update Pack zawierającego jfif.library i png.library, a także klasy Aboutbox.mcc
- wersja dla systemu MorphOS wykorzystuje zaawansowane możliwości MUI4 i może nie działać poprawnie na starszych wersjach systemu
UWAGA: Wersja SCANdala 1.5 wymaga MorphOSa 2.7
Dodatkowo, komputer musi być wyposażony w odpowiedni interfejs (SCSI lub USB) do podłączenia skanera. Interfejsy Firewire i sieciowy nie są narazie obsługiwane. Wymagane są także odpowiednich sterowniki do posiadanego skanera w standardzie Betascan. SCANdal jest tylko graficznym interfejsem do sterowników więc bez nich nie umożliwia skanowania.
Instalacja SCANdala
SCANdal jest gotowy do uruchomienia zaraz po rozpakowaniu go w dowolnym katalogu. Nie wymaga kopiowania plików do innych katalogów niż jego katalog domowy. Do poprawnego działania wymaga jednak sterowników Betascan w postaci plików #?.device obecnych w dowolnym katalogu na dysku.
Używanie
Preferencje sprzętu
Obecna komunikacja ze skanerami przez interfejs SCSI opiera się o dwa pliki #?.device. Pierwszy plik jest niskopoziomowym sterownikiem obsługującym komunikację protokołem SCSI. Dla systemu MorphOS, w przypadku użycia karty SCSI opartej o układy Symbios jest to urządzenie symbios.device stworzone dynamicznie w pamięci podczas wczytywania systemu operacyjnego. Dla Amig wyposażonych w karty scsi np. znajdujące się na rozszerzeniu Blizzard 1230 można użyć urządzenia 1230scsi.device.
Nazwa urządzenia obsługującego niskopoziomową komunikację powinna być wpisana w pole Urządzenie w preferencjach urządzenień SCANdala. Można także wybrać je z listy dostępnych urządzeń znajdujących się w pamięci operacyjnej lub wybrać plik na dysku. Jeśli chcemy wybrać urządzenie z listy należy zaznaczyc opcję Pokaż urządzania pamięci.
After selection the device, you have to select the unit, which usually is a device number on SCSI bus, or user-defined number in Poseidon USB stack preferences, for usbwrap.class (when we use older 68k EpsonUSB.device).
NOTE: For USB scanners drivers is not necessary to determining the number of unit as well as low-level device name.
Next you have to select Betascan driver file, by filling the Scanner driver' Some of the drivers require and allows you to set scanner's preferences in configuration files #?.conf. In older drivers, these files are placed in the S: directory, in the newer files are placed in the SYS:Data directory. If the directory does not exist you should create it. Refer to the SANE documentation for information about the configuration files.


In the Other tab one can select colors for ruler and default save paths and path for Sketch plugins (i.e Morphos:Applications/Sketch/plugins). Sketch plugins support requires Morphos 2.5 or later.
SCANdal opens the device and begins the communication during first scanning process. From version 1.3 icon tooltype (AUTOCONNECT = TRUE) has been added, which initiates the communication with the scanner when you run the program. In addition, you can connect to the scanner by clicking on the Connect button in the Info tab. If device preferences are changed when program is running, communication with old device is closed, and program will use new device from now on. Possibility of using multiple scanners at the same time will be added in future. After proper scanner configuration, you can save the preferences using Settings->Use or Settings->Save options from menu items. Restoring previous settings is possible by using Settings->Load last saved menu item.
Savers
SCANdal supports three graphic file formats:
- IFF DEEP - uncompressed data save, 24 bits per pixel.
- JPEG - save in 8 bits for images scanned in LineArt and Grey modes and in 24 bits if you scan in full color. For JPEG format you can set quality (1%-100%) and use progressive mode. The DPI information is saved.
- PNG - save in 8 bits for images scanned in LineArt and Grey modes, and in 24 bits if you scan in full color. For PNG format you can set compression level (1-7). The DPI information is saved.
- TIFF - save in 8 bits for images scanned in LineArt and Grey modes, and in 24 bits if you scan in full color. For TIFF format these compression modes can be set: : NONE, PackBits, LZW, Deflate, JPEG (JPEG compression may not work depending of tiff.library version). The DPI information is saved.
- PDF - save in 8 bits for images scanned in LineArt and Grey modes, and in 24 bits if you scan in full color, image compression support. PDF support requires hpdf.library.
Support for PNG and JPEG formats is compiled into a program in AmigaOS4.x, AmigaOS3.x and AROS version. In MorphOS versions, SCANdal uses jfif.library and png.library libraries, so it uses less memory and takes less disk space. More savers will be added in further versions.
Additional options:
- Auto suffix - automatically adds file extension (.deep, .jpg, .png) if user inputs filename without one
- Ask before overwrite - displays proper requester when you try to overwrite an existing file with the same name
Loading previously scanned images
SCANdal makes use of Reggae classes to load images and it checks images for its DPI to ensure proper printing/handling.
If Reggae decoder doesn't support DPI information or DPI information isn't saved in the picture one can select DPI from window.
For full loading support download additional Reggae decoders and demuxers from http://brain.umcs.lublin.pl/~rzookol/classes.html
Printing
SCANdal prints images using Turboprint (included in MorphOS).
Scanning preferences
Scanning preferences are divided into two tabs:
- General settings in Preferences -> Scanner tab allow to set up options like:
- Resolution (in dots per inch - DPI) using slider or gadget with predefined vallues
- Mode (LineArt - black and white mode, Grey - grayscale and Color - full color scanning, modes list depends of scanner abilities)
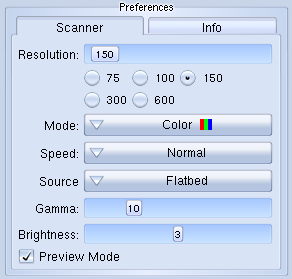
Depending on scanner and driver function: - hardware Gamma correction
- quality change
- negative scan mode
- scanning in preview mode, which should be faster than normal scanning mode
- scanning speed mode
- paper source (Flatbed/ADF/TA)
- halftones (works only in b-w mode for most backends)
- threshold (works only in b-w mode for most backends)
- Scanning area settings are placed in Scan tab, additionally in preview area you can mark the desired scan area using mouse, left button double-click marks whole available area. Scan area marker frame has got white spots. Holding left mouse button over them allows you to resize or move the frame. In MorphOS version, moving mouse pointer over the spots will cause it (pointer) to change shape, so the user knows, that the resize or move options are available.


In future, scanning preferences will be saved as separate project. This function is being implemented now.
Supported scanners
The following SANE backends has been ported to MorphOS:
| Backend name | Supported scanner list |
|---|---|
| umax | http://www.sane-project.org/sane-backends.html#S-UMAX |
| epson2 | http://www.sane-project.org/sane-backends.html#S-EPSON2 |
| epson (deprecated) | |
| gt68xx | http://www.sane-project.org/sane-backends.html#S-GT68XX |
| plustek | http://www.sane-project.org/sane-backends.html#S-PLUSTEK |
| mustek_usb | http://www.sane-project.org/sane-backends.html#S-MUSTEK-USB |
| plustek | http://www.sane-project.org/sane-backends.html#S-PLUSTEK |
| lexmark | http://www.sane-project.org/sane-backends.html#S-LEXMARK |
Scanners listed as supported by these backends on http://www.sane-project.org/sane-backends.html should work. In addition, scanner drivers written for Betascan 68k work (http://aminet.net/search?query=betascan).
TESTED SCANNERS
| Scanner model |
Driver | Morphos native |
Ports | Notes |
|---|---|---|---|---|
| UMAX Astra 1200S | Umax.device | Y | SCSI | working without problems quite fast |
| Epson 1640SU | Epson2.device | Y | USB 1.1/SCSI | working without problems, fast ADF supported, TA supported |
| Mustek Paragon 600 II CD | mustek.device | N | SCSI | working without problems quite slow |
| HP ScanJet 6300C | hp.device | N | USB 1.1/SCSI | stop working after a few scans probably hardware failure |
| Mustek BearPaw 1200 TA | gt68xx.device | Y | USB | quite slow, TA supported, problems with quality |
| Plustek S24 | gt68xx.device | Y | USB 1.1 | gamma supported, slow warming up, quality quite ok |
| Mustek 600 CU | mustek_usb.device | Y | USB | working without problems, MorphOS 2.7 required, gamma, preview, threshold supported |
| Epson Perfection 1260 Photo | plustek.device | Y | USB | TA supported, can't change color mode, can't change scanning area size - driver problem |
ADF - Auto Document Feeder,
TA - Transparency Adapter
Configuring EPSON Scanners
- Download epson2 driver: [1] (08.01.2011)
- Unpack files to any directory
- For SCSI scanners choose valid communication device in Device field (for example symbios.device).
- In SCANdal preferences choose Epson2.device full path in Scanner Driver
- Copy epson2.conf to S:
- For SCSI scanners leave this file unchanged
#epson2.conf
#usb prod_id vendor_id
#usb 1208 266
scsi EPSON
- When You use USB just comment scsi line and uncomment usb 1208 266:
#epson2.conf
#usb prod_id vendor_id
usb 1208 266
#scsi EPSON
You have to look in poseidon preferences whether product id and vendor id match (decimal numbers). Values 1208 and 266 in this example are for Epson 1640SU only! Additionally, scanner has to be unbinded from any Poseidon usb classes (if it is binded) and Device field in SCANdal preferences should be left blank.

Configuring gt68xx Scanners
- Download Driver: [2] (25.12.2010)
- Copy the device to any directory
- Download scanner's rom and put it in s:gt68xx directory
- Create a configuration file s:gt68xx.conf
 # Autodetect Mustek BearPaw 1200 TA and Mustek BearPaw 1200 CS
 usb 0x055f 0x021e
Additionally, scanner has to be unbinded from any Poseidon usb classes (if it is binded) and Device field in SCANdal preferences should be left blank.. You have to look in Poseidon preferences for your scanner product id and vendor id (hex format) or check this page for ids and roms: http://www.meier-geinitz.de/sane/gt68xx-backend/
Configuring UMax Scanners
- Download Driver: [3]
- Copy the device to any directory
- Create/copy a configuration file s:umax.conf
- Choose valid scsi device (for example symbos.device) in SCANdal preferences Device field and appropriate Unit number.
If Your scanner doesn't work well in color mode try setting "option scan-lines" to lower value (10). It has been rewritten not to use fork() and pipe() so it's more stable than 68k version and it supports only SCSI connections.
Configuring mustek_usb Scanners
- Download Driver: [4] (20.01.2011)
- Copy the device to any directory
- Download to S: [5]
- In SCANdal preferences choose mustek_usb.device full path in Scanner Driver field
Configuring plustek-usb Scanners
- Download Driver: [6] (11.01.2011)
- Copy the plustek-usb.device to any directory
- In SCANdal preferences choose plustek-usb.device full path in Scanner Driver field
- Copy plustek.conf to S:
- Edit configuration file
#[usb] vendor- and product-ID
[usb] 0x07B3 0x0017
Additionally, scanner has to be unbinded from any Poseidon usb classes (if it is binded) and Device field in SCANdal preferences should be left blank.
Configuring lexmark Scanners
- Download Driver: [7] (11.01.2011)
- Copy the lexmark.device to any directory
- In SCANdal preferences choose lexmark.device full path in Scanner Driver field
- Copy lexmark.conf to S
Additionally, scanner has to be unbinded from any Poseidon usb classes (if it is binded) and Device field in SCANdal preferences should be left blank.
Configuring canon630u Scanners
- Download Driver: [8] (30.11.2010)
- Copy the canon630u.device to any directory
- In SCANdal preferences choose canon630u.device full path in Scanner Driver field
THIS DRIVER HAS NOT BEEN TESTED. BE CAREFULL
Additionally, scanner has to be unbinded from any Poseidon usb classes (if it is binded) and Device field in SCANdal preferences should be left blank.
Authors
- Main code
- Michał 'rzookol' Żukowski
- rzookol at poczta.onet.pl
- rzookol at brain.umcs.lublin.pl
- rzookol / #morphos / #ppa freenode.net
- Additional code
- Gianfranco 'ShInKurO' Gignina
- Icons
- Maciej Żukowski